Formtastic Documentation
Set value function: save time by automatically filling in preset values
With the set value function, your employees no longer have to type in standard information like customer addresses by hand every time. Select a field, enter a name, or scan a barcode – and all stored values are automatically filled into the matching fields. That saves time and avoids typos.
How to set up preset values
- Open your form template in the Form Designer.
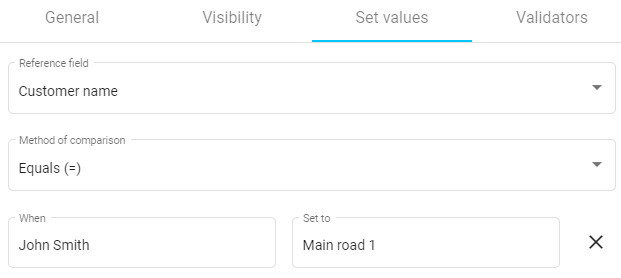
- Click the input field that should be filled in automatically, and open its settings.
- Switch to the "Set values" tab.
- Define your value blocks here and link them with when-then rules.
Comparison methods
Depending on the reference field, the following comparison methods are available:
- Simple comparisons: Equal (=), Unequal (≠), Greater than (>), Greater than or equal to (≥), Less than (<), Less than or equal to (≤), Is empty, Is not empty, Set, Is not set, Selected, Not selected – self-explanatory in use.
- Multiple comparison: In, Not in. Enter several values separated by commas in the When-field, e.g. 1,2,3. The rule is considered fulfilled as soon as one of these values is entered in the reference field.
Lots of values at once? Import via Excel
Instead of creating large amounts of data one by one, import entire value lists via an Excel spreadsheet. The import replaces all previously created setpoint blocks.
- Click the black i-icon next to the import button – it lists the reference fields and comparison methods available for your template.
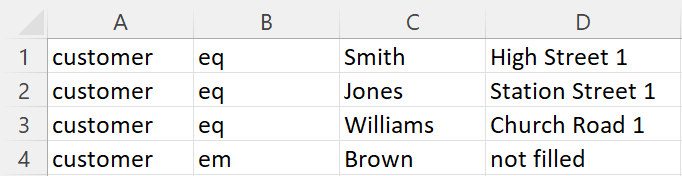
- Enter your data row by row in the first 4 columns:
– Column 1: Reference field
– Column 2: Comparison method
– Column 3: When-value (condition in the reference field). For methods that don't need a condition, e.g. "Is empty", leave this cell blank.
– Column 4: Then-value (the preset value that should appear) - Upload the finished Excel file via the import button.
Here's an example: